If you’re a parent or caregiver looking to create something special and heartfelt for your little one, a handmade bunny crochet rattle could be just the perfect project. Not only will this adorable bunny rattle be a lovely keepsake, but it also offers a unique sensory experience for your baby, encouraging both sight and touch as they play with it. Whether you’re an experienced crocheter or a beginner, this step-by-step guide will walk you through the process of creating a soft, cuddly bunny rattle, designed with love for your baby.
In this article, we’ll delve into the essential details and considerations for making a bunny crochet rattle, and by the end, you’ll be ready to embark on this cozy, creative journey. Let’s get started!
The Charm of Handmade Baby Toys
There’s something incredibly special about making something with your own two hands. When it comes to baby toys, handmade creations are not only more meaningful but can also be designed with your child’s safety and development in mind. A crochet bunny rattle, for instance, can be created from soft, baby-friendly yarns and filled with a gentle rattle sound that will captivate your baby’s curiosity.
Beyond the functional aspects, there’s a real joy in crafting a toy that your little one will cherish as they grow. From a soft bunny cuddling up to your baby’s tiny hands to the delightful jingle as they shake it, this rattle becomes more than just a toy – it becomes a comforting companion.

Why Choose a Bunny Rattle?
Rattles are a classic choice for baby toys. The sound they produce not only entertains babies but also helps them develop their auditory skills. The bunny shape adds an additional layer of cuteness and can evoke a sense of warmth and affection, making it a wonderful gift or keepsake.
Furthermore, crocheted rattles are gentle on a baby’s skin. Unlike plastic or other synthetic toys, crochet yarn is soft, breathable, and less likely to irritate delicate skin. Using organic or non-toxic yarn makes it even more appropriate for babies. The best part is that, as a parent or creator, you can personalize the design – colors, patterns, and textures can all be chosen to suit your preferences and the environment where your baby will be playing.
Getting Started: Materials You’ll Need
Before you dive into the world of crochet, it’s essential to gather all the necessary supplies. Don’t worry – this project is relatively simple and doesn’t require many materials. Here’s what you’ll need to begin creating your own DIY bunny crochet rattle:
-
Soft Cotton Yarn: Choose a soft, breathable yarn. Organic cotton yarn is a great option for babies, as it’s safe and gentle.
-
Crochet Hook: A size 3.5 mm or 4 mm hook should work perfectly for this project.
-
Fiberfill Stuffing: To give your bunny a soft, plush body.
-
Rattle Insert: This can be purchased at craft stores or online. It’s typically a small plastic ball with a jingle sound inside.
-
Stitch Markers: To help you keep track of your rows.
-
Yarn Needle: For sewing parts of the bunny together and finishing off.
-
Scissors: For cutting the yarn once you finish your project.
-
Safety Eyes (optional): If you wish to give your bunny rattle eyes, you can purchase small, secure safety eyes. You could also crochet the eyes instead.
Now that you have your materials ready, let’s walk through the steps to create your bunny crochet rattle.
The Process: Step-by-Step Instructions
1. Creating the Body
The first step is to crochet the main body of the bunny. Begin by creating a magic ring to start the project. This will form the base of the bunny's body.
Start by crocheting single crochet (sc) stitches into the magic ring, and continue working in a spiral. You will increase the number of stitches in each round to shape the body. As you move through each round, keep your stitches tight enough to ensure that the bunny will hold its shape but not too tight that it becomes difficult to work with.
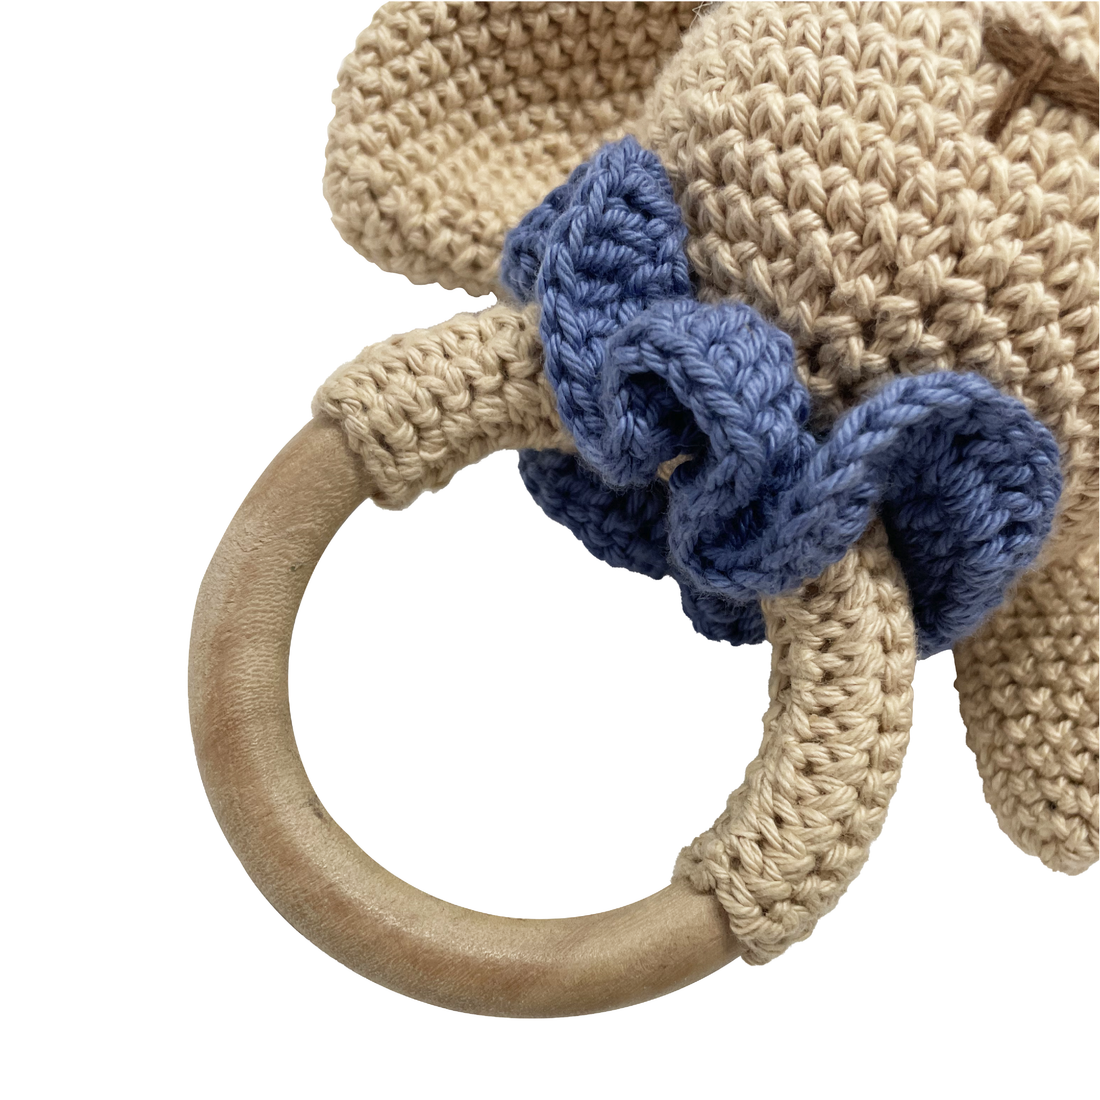
Work a few rows until the body reaches a nice, rounded shape. This is also where you will want to add the rattle insert. You can place the rattle ball inside and continue crocheting to close it up. This will ensure the rattle sound is trapped inside the body, making it safe and secure for your baby.
2. Crocheting the Bunny’s Ears
The next step is to create the bunny’s signature long ears. This part is relatively simple but requires some attention to detail to get the perfect shape.
Using a slightly different color or the same yarn, crochet two pieces for the bunny’s ears. Start with a chain and work in rows of single crochet. After creating the length, taper the ends to give them that lovely, pointed bunny ear look. Once both ears are complete, attach them to the top of the bunny’s head.
Make sure the ears are securely sewn in place, as babies are likely to tug at them while playing.
3. Adding Facial Features
To bring your bunny to life, you’ll want to add the face. If you are using safety eyes, simply sew them onto the face. You can place them closer together for a cute, innocent look or spread them out for a more expressive bunny face.
For the nose, you can crochet a small pink or neutral-colored circle and sew it on, or use embroidery thread to stitch a little triangle. Some parents prefer to embroider a smile, but this is entirely up to you! The face will give your bunny rattle its personality, so have fun with it.
4. Assembling the Rattle
At this point, the individual components of the bunny crochet rattle will be complete. Carefully sew the bunny’s head to the body, making sure everything is aligned well and securely attached. You can use a yarn needle to weave in any loose ends and trim excess yarn.
Once your bunny’s body and head are connected, the final step is to add the finishing touches. If you wish to make the rattle even more interactive, you can crochet little arms and legs to give your bunny more movement. These can be simple loops of yarn that are stitched on the body.
Finally, add any final embellishments like a little bow or additional color details. Once all of the pieces are secured, give your bunny a final inspection to ensure that all parts are safe and well-attached.
The Joy of Personalization
What’s fantastic about making your own bunny crochet rattle is the ability to personalize it. You can pick the colors that suit your baby’s nursery, or create a matching set for a baby shower gift. Soft pastel shades like pale pinks, blues, or yellows are popular, but feel free to get creative! You can even choose yarns with unique textures or opt for a two-toned design for an added twist.
Don’t forget that the yarns you choose should be soft and baby-safe. Opting for organic, non-toxic fibers will ensure your baby’s safety and give you peace of mind. Adding gentle rattle inserts, bells, or beads can further enhance your baby’s sensory development, engaging their hearing and touch.

Why Handmade Baby Toys Matter
Handmade baby toys, like a crochet bunny rattle, hold a certain magic. There’s something inherently special about knowing that a toy has been made just for your child, with love and care. In a world full of mass-produced items, a handmade gift speaks volumes about thoughtfulness and creativity.
Additionally, crochet rattles are often free of harmful chemicals and plastics, making them a safer option for babies. The organic cotton yarn typically used in such projects is soft on the skin and hypoallergenic, which is perfect for a baby’s delicate health.
In the case of a crochet bunny rattle, not only will it provide endless entertainment for your little one, but it will also serve as a treasured keepsake that can be passed down or saved for future generations.
Suggested Reading: How to Style Your Baby’s Outfit with Adorable Pineapple Print Bibs
Conclusion: Creating Lasting Memories with Happy Matty
If you’re eager to take on a DIY project that’s both rewarding and practical, making a bunny crochet rattle is a delightful way to go. The process is simple, enjoyable, and perfect for beginners. With the step-by-step guide outlined above, you can create a toy that will become a cherished part of your baby’s early memories.
If you love creating handmade gifts and want to explore more baby-friendly products, head over to Happy Matty for more inspiration and high-quality materials. Their selection of yarns, patterns, and accessories ensures that you can continue crafting beautiful, safe, and personalized items for your little ones. Happy crocheting.